Tuesday, November 29, 2011

Light My Fire

I'm pretty sure the "aging University of Miami fan" guess was totally worth leaving you all hanging yesterday. Anyway, we made a purchase. A big one. But first let me give you a little backstory so you don't think we're completely crazy . . . 


When we were house searching our wants/needs list included things such as:
- 3+ bedrooms
- 1+ bathroom
- Oil or natural gas heat
- Basement
- Large, spacious kitchen
- Backyard
- Garage
- Fireplace
- Hardwood Floors


. . . You get the idea. Well, we were able to get a lot of things on our list (4 bedrooms, 1 bathroom, oil heat, basement & hardwood floors) - but a few things were just not a part of the brick beauty that we fell in love with.


So we're going to add something. A wood burning stove!
This is an old Vermont Castings Stove. We saw it on Craigslist and decided to drive out to the boonies to check it out. We fell in love immediately, so we handed over $250 and took this baby home.


Here's where the trouble begins . . . actually installing the stove. Luckily my dad is a mason so he can help us with the whole process, because let me assure you it is daunting. 


A few things we need to do are:
- Work with our township inspector and homeowner's insurance agent to make sure everything is to code
- Install a slate base for the stove to sit on (it will be raised several inches off the ground) - this is because wood floors are combustible surfaces
- Bore a hole through the wall to attach stove pipe and carry it outside
- Decide whether we are going to use temporary pipe and then build a permanent brick chimney or use double-wall insulated pipe and box it in outside.


There's a lot to think about and a lot of decisions to make. We're still not even certain that installing the stove is a possibility. We may end up having to resell it if the installation process is too costly. We need to do some more research and planning. But, we're super excited about the possibility!


If all goes as we'd like, the stove will end up in the corner of our living room with a raised slate base. And yes, I will sit on the couch and lovingly adore it all the days of my life.
Until we figure out exactly what we're doing with this whole wood stove installation nonsense, there will be no loveseat purchasing. That's why among being beautiful and hot (get it?), this bad boy is also a game changer.


We're seriously crossing our fingers that we can get this installed and not spend a small fortune in the process. And we're very excited to see wood chopping and hauling in our future!
I'd love to hear your thoughts - do you think we're crazy? Have you ever installed a wood stove? Any tips or advice?

Game Changers

Last time I talked about our hunt for the perfect loveseat, Justin and I were still a little undecided on the Bella and wanted to try on a few more sofas for comparison. Since then we have visited Raymour & Flannigan, American Signature Furniture, Pottery Barn Outlet, Thomasville, and LazBoy again. We only saw one loveseat that we kinda liked . . . 
But it didn't come in brown, so it was nixed faster than the button flew off my pants on turkey day.


This one chaise was super comfortable, but it was equally ugly. So we smiled and sighed and moved along.
After feeling too much like Goldilocks, we battled our indecisive selves and decided to get the Bella loveseat from LazBoy. 


But the universe had another plan. We ended up making a big purchase that is going to change the layout of our living room and require some serious renovation work. What is it you ask? Here are 2 hints:
- It is old
- It loves hurricanes


192 blogger points to the person that guesses correctly!! Oh and make sure you check back tomorrow to find out what it is and how we plan on incorporating it into our home.


Has any one else had any game changers lately? 

Monday, November 28, 2011

Thanksgiving Wrap-Up

How was everyone's Thanksgiving weekend? Did anyone battle the masses on black friday and find some killer deals?


We spent Thanksgiving with Justin's family. And I can assure you I ate enough sweet potato casserole to last me for the rest of the year. But besides the amazing food, we really enjoyed just relaxing and catching up with the cousins (and the newest family member baby Miller!). 

Oh and my heart swooned over this centerpiece my mother-in-law made!
Right now I need to attack the piles of nonsense all over our home, start some laundry and wash the dirty dishes piled in the sink. 


But make sure you check back tomorrow to read all about our loveseat-hunting progress!

Thursday, November 24, 2011

Day of Thanks

Make a joyful noise to the Lord, all the earth! Serve the Lord with gladness! Come into His presence with singing! Know that the Lord -  He is God! It is He who made us, and we are His; we are His people, and the sheep of His pasture. Enter His gates with thanksgiving, and His courts with praise! Give thanks to Him; bless His name! For the LORD is good; His steadfast love endures forever, and His faithfulness to all generations.  ~ Psalm 100:1-5


God saw me - a helpless sinner - and chose to not just save me, but to prepare for me. And it is only because of His great sacrifice that I can experience far more joy than I'll ever deserve.


I hope you have a wonderful and blessed Thanksgiving! 

Wednesday, November 23, 2011

Thanksgiving Table

When I walked downstairs this morning, I took a picture of our dining room. You can see the extent of my Autumn decorating in this room are the leaves placed around the mirror. Other than that, this is what our dining room looks like on a day-to-day basis. After the kitchen, I would say this room is the center of our home. We eat, do computer work, and craft right at this table. 
But every now and then even the most tomboy of dining room tables likes to get dressed up and be treated like a lady. Since I am not hosting Thanksgiving this year (or more likely for many years), I decided to do a few quick mock-ups of how the table might look if I was hosting.


Look #1: Classic & clean white tablesetting.
I started with a basic white and tan checked tablerunner (*cough*scarf*cough*). Then I layered my china (which was my grandmother's from her wedding that she passed down to me!) and cups/utensils.
For the centerpiece, I decided to stack a couple antique books and place a white pumpkin on top for a little autumn-vibe. Then I scattered my famous birch tealight holders along the table.


Look #2: Where my table no longer becomes vertically challenged.
All I did was swap out the book/pumpkin centerpiece for my vase filled with dried hydrangeas.
I like how the deep red in the vase plays off of the curtains/cabinet.


Look #3: Casual gathering of friends.
If we had a few friends coming over for a simple dinner, I'd keep the table equally simple. I swapped out my grandmother's china for our everyday casual china plates. Then for the centerpiece I subbed in a bowl of pinecones. I decided to use my green glasses to add a little touch of color.
And apparently, we eat with our hands. :)


If I was truly hosting Thanksgiving I would definitely put a little more time and thought into my table setting, but for a quickie mock-up using only what I had on hand - I'm pleased as pink. Although some napkins would definitely be a nice touch and help class things up a bit.


What do you think? Which table setting do you like best? Or do you despise them all? How will you be setting your table for Thanksgiving?


ps: krystle from color transformed family passed the versatile blogger award on to me. Thanks lady!! Since Brandi graciously passed the award to me earlier, I won't make you hear any more random facts about my life. I do want to pass the award on to Ashley from Attempts at Domestication though. Just because she's awesome and then we can keep this bad boy bloggie award alive :)

Monday, November 21, 2011

Weekend Travels


When we got married and became Team Rothenberger, we knew we wanted our home to be a place of comfort and laughter and love. A place where our families and friends felt welcome and relaxed. And that's why we work so hard on making our house into a home. It's because of the people that are a part of it.
But we hold fast to the principle that even though we want a beautiful and inviting home, we value our relationships with people more. So instead of working on our house projects this weekend, we packed up our bags and spent time with our family and friends.


All this was to say that I don't have any house progress to share. And I may not for a few days... but I've got memories to last a lifetime. And that's better than any wreath in my book.


What did you do this past weekend? Any one else take a weekend trip?

Thursday, November 17, 2011

The Hunt

I mentioned way back in our living room reveal post that our room was only about 60% done. Our to-do list looked like this:
     - Hang art/pictures on walls
     - Get a rug for the front door   completed!
     - Get a loveseat 
     - Paint trimwork
     - Find/make throw pillows   completed!

Well we've been working on that third item. Finding a loveseat. Who would have thought it'd be so hard? 


We wanted a loveseat that complimented the couch we already had. We were looking for:
- Higher back
- Wooden legs
- Slightly rolled arm


After an exhaustive online search, we decided to visit Wolf & Interiors. Both of these are fairly local stores that we've heard fantastic things about. So we had high expectations. These high expectations were immediately shot down by the store's equally high prices.


Then we decided to visit La-z-boy Furniture.
The one loveseat that we really liked was the Bella. 
We want to get it in a fabric that coordinates with the couch we already have. . . so we narrowed it down to these 2 choices.


We mapped out how much space the couch would take up. If you notice the frog tape - that's the length of the couch
You'll have to excuse the shoes / bags / artwork - just keeping it real people :)

After some serious photoshop efforts by Justin, we chose the couch in the "Mollasses" color. We went this past Tuesday to order it but had a change of heart in the store. We want to look at a few more places before we finally decide if it's the one for us. Try on a few more couches.

Yeah, we're those indecisive people.

This weekend we're planning on visiting Raymour & Flannigan and American Signature Furniture. Hopefully by Monday we'll have it all together!

Any recommendations? What do you think of the Bella - is she our beauty? Did your couch search take months too? 

Wednesday, November 16, 2011

Colorful Creation

Disclaimer: Today's post is random and has nothing to do with home improvement or painting things black (shocker!). It's just that every so often something other than shiny candlesticks and burlap pillows stops me dead in my tracks and brings me back. It makes me realize how small I am and how unimportant the shade of green in our kitchen is. 


A little backstory . . . Justin & I help out with the youth group at our church. I basically gab with the girls, and Justin leads the teen worship band. 
Before youth group on Sunday while I was watching them practice, I noticed something beyond the 80s couches. . . 
I frantically ran outside to take some pictures of it.


For a moment, this view left me - the girl that has way too much to say -  simply speechless.

It reminds me that when I sit on the couch and look over paint swatches - there isn't a color in the world that God didn't create. And there isn't a thing in the world He doesn't know about. 

And I find a whole lot of comfort in that.

The heavens declare the glory of God; the skies proclaim the work of His hands. 
Psalm 19:1


Has anything taken your breath away lately?

Tuesday, November 15, 2011

MTV Cribs Style

I was hopping around CNN yesterday when I stumbled upon this article. National Clean out your Refrigerator Day. Huh. Somehow this holiday didn't show up on my google calendar. 


Well, as I read the article I realized I had 2 things: 
1. 40 minutes until I needed to get ready for work
2. A messy and neglected fridge


So I did what any crazy lady would do and filled a bucket up with hot water/soap and emptied out that ole' refrigerator box. 


Before:
 I'll spare you the before shot!


During:


After:
Note: Go shopping soon!!
I try to keep track of what's in our fridge that way I'm not throwing away spoiled food. Remember, I like to save money? So the only spoiled food we had was a half-full container of sour cream and a thing of crescent rolls. I'm not sure how those rolls managed to stay under my radar that long - they usually get gobbled up faster than cranberry sauce at Thanksgiving dinner.


What I continued to neglect though was the freezer. And it's definitely ready for a good clean out. It's on my to-do list. 


Did anyone else have any random cleaning bouts recently? How do you organize your fridge - do you put condiments or drinks on the door? I used to have the drinks on the door but I rearranged yesterday so it holds more condiments. So far, so good.

Monday, November 14, 2011

Shopping Spoils

At the end of our dresser reveal post, I mentioned this local store that sells partially used craft supplies for super cheap. Well, if you read yesterday's post you would have seen that I'm all about saving moolah. So naturally a store that sells fabric scraps and wreath forms for cents, I was all over like white on rice.


I went to this store last week with my friend Amanda. It took us about an hour to really scour the store and discover the loot we wanted to call our babies, but it was so worth it. Wanna see my spoils? 


They have a big container full of old buttons. You can fill up a cup of buttons for $1.50. I specifically chose blue/gray buttons for a project I have in mind. You'll have to just hold your breath until I reveal the project. 


For 0.75 cents, this bag of burlap scraps was mine. Some of the pieces are smaller, but some are fairly large. I think I'm going to use this to jazz up the Christmas wreath I've been working on (details coming soon!).

For 0.50 cents, I bought this fabric scrap. It has red and pink hearts and glitter. I'm going to hem the edges and make a table runner for Valentine's day. It's the one day of the year I can decorate with pink hearts and glitter and you better believe George I'm going to milk that sucker for all it's worth.
* That glitter makes me giddy.


Now my big splurge of the day. . . For $1.75, I bought a fabric scrap that is 1 3/4 yard long and 56" wide. We were about to leave the store when Amanda spotted this baby lying under some other fabric scrapes. And when she decided not to buy it, my heart may have squealed a little. I am going to make this darling in to a beautiful tree skirt. It fits perfectly with my theme for the year! (Don't worry, I'll start talking about Christmas as soon as Thanksgiving is over!)


And lastly, this old wooden art piece was sitting in the corner at the back of the store. It's mustardy-yellow color called to me and asked if I would bring it home. For $1, there was no way I would let this baby go unnoticed again. You can see the black trim is missing on 2 edges. I'm either going to make 2 more trim pieces or pull the other 2 pieces off and paint the edges . . . I haven't decided yet.
Grand Total: $5.83 


I'm so excited to have all these new projects that need to be done! Is it too early to decorate for Valentine's day? What good spoils have you found lately?


ps: if you're interested in finding a creative reuse store near you, check out this link. Creative Reuse doesn't know that I exist and they certainly didn't ask me to write about their awesomeness - I just wanted all 6 of my readers to know about this great resource. All of the opinions I've expressed are entirely my own.

Saturday, November 12, 2011

Super Duper Savings

Let's talk laundry. If you're anything like me, your eyes just perked up.


I kinda enjoy doing laundry. The actual task of gathering clothes and putting them in the washer/dryer is satisfying. It's one thing I can get done quickly and cross off that never ending to-do list. I don't like putting the clothes away.. but that's a post for another day.


Justin & I accumulate a lot of laundry each week. I don't like to wear jeans or anything more than once. And I like to change kitchen washcloths/towels every other day. All this unnecessary information is just to paint a picture of several overflowing laundry tubs each week at the Rothenberger casa.


When I thought about that Tide I was pouring several times a week I regarded it as liquid gold. That blue liquid was costing us a lot of moolah. And I don't like spending moolah on things that aren't beautiful or shiny or comfy.


Seriously, I'll pinch a penny anyway I can. So I made my own detergent. And you know what? I love it. It's soft on our clothes, good for the environment, and the best part is . . . it costs next to nothing. Seriously nothing and laundry detergent are standing in line together.


If you want to save money or smell good or get down with Mother Nature, here's what to do.


Step 1: Buy Borax, washing soda & a bar of soap. 
* I got all of these at the grocery store. I lost my receipt, but I remember it cost between $6.50 - $7.00 for these items.


Step 2: Grate the bar of soap into cute little crumbles.
* I used my regular ole' cheese grater and it took me all of 2 minutes to grate the whole bar. Way easier than grating a block of cheese I'll tell you that much.


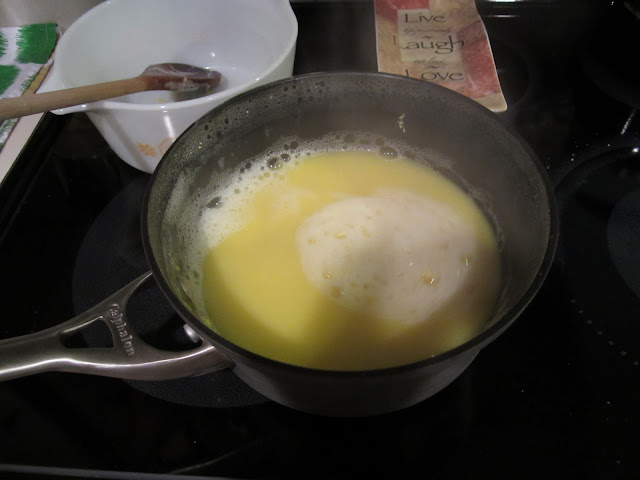
Step 3: Boil 4 cups on water on high heat. Then add the grated bar of soap and stir until it's all disolved. 


*My water turned yellow-ish because that was the color of the soap. 


Step 4: Pour 3 gallons of water in to a 5-gallon bucket.


Step 5: Add your soapy water to the bucket. Add 1 cup of the washing soda and 1/2 cup of the borax to the bucket.


Step 6: Stir really well. 


Step 7: Cover it with a lid and let it sit for 24 hours. Unless you're impatient like me and check it out first thing in the morning.


This is what my detergent looked like the next day.


I would compare the consistency to a watery jello. I tried to illustrate the texture by grabbing a gelatinous blob with my wooden spoon.


It's all good though. Just use 1 cup of this liquid goodness in each load and do a happy dance about all the money you'll be saving.


It cost $7 for all the ingredients up front - but I still have enough borax and washing soda to make at least 12 more bucketfuls. I'd have to buy some more bars of soap though and they cost $1 each.  So I could make a minimum of 65 gallons of detergent for $19!! That's 0.29 cents a gallon!


My homemade detergent just karate kicked Tide to the curb.


ps: when I was researching how to make detergent one source said that you could add a couple drops of scented oil to make your detergent pleasing to your smelly sense. My nose just prefers my clothes to smell like clothes, not wildflowers or fresh rain, so I didn't add anything.


pps: do you have any secrets to save a quick buck? any awesome at-home recipes you'd like to share? Let me know! I'd love to hear all about them!

Thursday, November 10, 2011

The Grand Finale

When I was in college I had this one professor who made us write reflection papers on every project we did, test we took, and paper we wrote. That's probably what I get for being an English major. But, this whole idea of constant reflection has really stuck with me. For me, it's helpful to focus on what went well and what I could have done differently. So how does this relate at all to my blog you ask. . . well, I would like to take a moment to reflect on the dresser refinishing project. 
I know you probably thought I was done with this whole project when I revealed the dressers yesterday, but the way I see it is. . . Kim Kardashian was married for 72 days and we're going to be hearing about that forever, so if I worked on this project for around 72 days then I can at least talk about it for a week. 


For the handful of you who have read our "about the rothenbergers" page, you've seen that Justin & I are in no way, shape, or form home-improvement experts. Truthfully, we're barely novices. Justin has a lot of hands-on experience from growing up on a farm, but many things are still new to us. And we're just trying to learn as we go and learn from each other.


So this is what we learned from the dresser refinishing project:
- Home improvement projects always take longer than you think. I need to be a little bit more fluid with deadlines. My type-A personality wants things done immediately, but in order to do things well you need to commit the time. Which brings me to my next point . . .
- I am so very grateful that Justin is a man of detail. It showed in our DIY wedding and it is showing in our DIY home. Things that I tend to gloss over, he notices. We're like peanut butter & jelly.
- Justin definitely recommends pre-drilling the holes for hardware before priming/painting.This way if he makes a mistake he still has time to correct it and he doesn't have to make any marks on the finished surface.


- Poly is very glossy. We used satin finish poly and the dressers still turned out a little more glossy then we would have liked. Next time, we'll thin the poly out.
- Frog tape worked great to help us keep a straight line on the inside of the dressers. I would recommend this a hundred times over.


- We slightly regretted using a white primer. This showed through very easily when we antiqued the dresser and sanded the edges. It resulted in us needing to touch-up the dressers several times. So if you're painting a piece of furniture dark I would have the primer tinted to a darker shade as well.
- And lastly, the trial and error approach is okay sometimes. It took us several attempts to figure out how to get the cherry-wood-with-antiqued-black-paint-finish look, but we eventually found something we're happy with, and the sense of accomplishment we feel over the dressers was well worth all the blood, sweat, and tears. (Yes I cried - don't act so surprised mom)


A big THANK YOU to everyone who commented this week and encouraged us as we worked on the project. We really appreciate it! 


Enough about me - what are your weekend plans? Any DIY projects in store? 
Dresser Reveal!!

I came home from work last night to find Justin in the basement putting the hardware on our dressers!! Serious excitement took place over here at the Rothenberger household. Now, before I move on to the beauties, let's do a quick recap. The dressers were white and very heavily distressed to begin with and after scraping the paint off we were left with this (more on that process here). . .

And my 2 for $15 yard sale end tables looked like this.

I haven't shown the old hardware yet, so brace yourselves. They were blue and yellow, and they alternated for each drawer. My 7th grade self is a little embarrassed by this choice - but in the 90s they were rocking!

We did try sanding the paint off of the handles, but it was downright impossible. This gave me an excuse to buy all new hardware. Oh what a happy day that was! We chose Amerock Atherly hardware in antique silver from Home Depot. The knobs were $2.98 each and the pulls were $3.48 each which came to a little under $50 for 7 knobs and 8 pulls. What can I say? We splurged once we saw their antique color and delicate details. My pictures didn't do justice to their beauty so I grabbed some from the company's website.
My heart starts beating fast around them.

Anyway, back to the real juice of the story - the dressers! I do not have a very steady hand, so instead of attempting to paint straight lines along the edges by the opening of the drawers, we decided to tape them off with some good ole' frog tape. When we pulled the tape off we were left with perfectly straight lines! Sweet!

Side note: We decided not to paint the inside of the drawers because they're solid wood and still in great condition. At some point they need to be repapered - but that's a project for another day when I'm not high on poly fumes. We did however paint the inside of the end tables because they were a wacky green color and, well, that just didn't jive with our black beauties.

I got home just in time to get a picture of Justin attaching the last dresser pull. We had pre-measured and drilled the holes prior to painting.

Finally, the moment you've all been waiting for . . .

Would you like to see them in their natural habitat? Oh okay fine. Here's the little fella!


And our big boy. . .

And the gorgeous end tables.


And the entire room in all her glory . . .


I am so happy with the way the dressers turned out! There are a few things we would have done differently - but more on that tomorrow. For now, let's just bask in their beauty.

So what do you think? Do you love them? Or did I let you down?

And please keep in mind, our bedroom is far from done. 

Our short list looks like this:
- Paint walls
- Patch and repair ceiling
- New ceiling fan (coming soon!)
- Add some artwork / pictures
- New curtains 

Our long list looks like this:
- Replace carpeting
- Redo trim work
- Crown moulding? (a girl can dream, right?)

By the way, if you noticed the plastic storage bin - 100s point to you for being observant. Then minus 200 points to you for pointing out our shortcomings. Just kidding. :) But, we do need to figure out a better extra clothes storage solution soon (say that 10 times fast). You see, both of those dressers were mine before Justin & I got married so now that we share, there isn't enough space for everything. I'm thinking a clothes clean-out is in our near future.

Well I'm off to go stare at the dressers until my friend Amanda gets here. We're going to this fantastic store downtown that sells partially used craft supplies for super cheap. It's amazing... we're talking wreath forms and fabric scraps for a quarter. Have a great day!